CSS files can become quite large/ cumbersome. Additionally, there are some issues with CSS. These include:
- not having an ability to use math (for example take current border width and add 5 pixels to it),
- not being able to reuse common styles
- not being able to modify existing values
- not being able to specify variables (and define them with initial values).
Because of these issues, tools like LESS and SASS have arisen. SASS is based on Ruby. For sake of introducing the concepts, I thought it appropriate to focus on LESS. While one could run the minified LessCSS JavaScript library and dynamically change .less files to .css files, this is fairly inefficient and will affect the performance of your web pages. Therefore, it is considered a best practice to use tools on your computer to convert the .less file to .css before uploading to the production environment. These tools typically watch the contents of various folders and automatically make the conversion when a file changes. To understand the concepts, I recommend using either CodeKit (Mac) or SimpLESS (Mac or Windows) or WinLess (Windows). Note that SimpLESS relies on the Titanium SDK (separate install in Windows and some limitations on Mac). For my purposes, I used CodeKit.
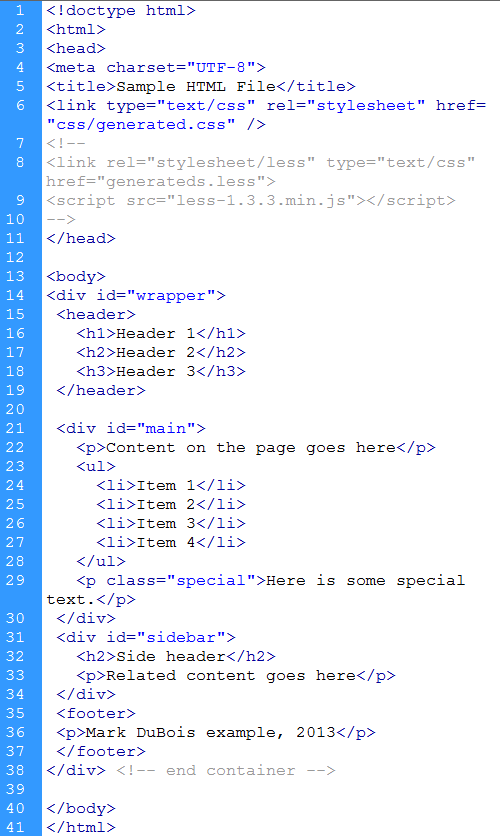
I downloaded and installed CodeKit on my Mac. I then pointed to a folder where I placed some sample HTML and a could of .less files. Let’s examine these files. The simple HTML file is shown below. Note that lines 8 and 9 have been commented out. This would be one approach to dynamically generating the CSS file from the LESS file (but it would be very inefficient).
There is nothing that special about the HMTL. There is a wrapper division which contains a main and sidebar. There is also a header and footer. We will be styling the majority of these elements. We want the main and sidebar to represent 2 separate columns (side by side). When you examine the CSS, you will probably think – there are alternate approaches to styling (or I can do better). You are correct. I am focusing on the use of LESS to generate the CSS and have made this a somewhat contrived example.
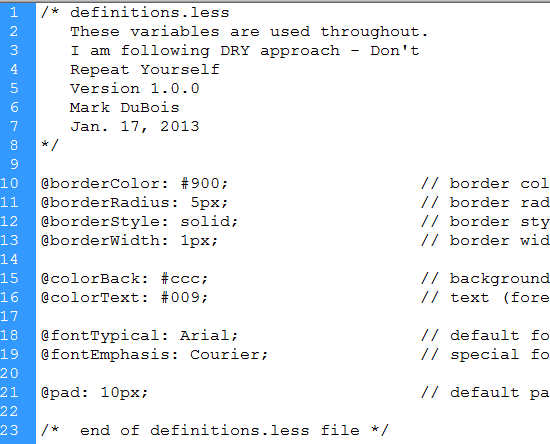
The first file we should examine is definitions.less (below).
It looks a lot like CSS (with included comments). One major difference is the use of the @ symbol to define variables. By including variables in a separate file and then importing it into another file, we begin to approach CSS as we would any other programming language. I can also then make changes to one spot and all the generated CSS will change accordingly. Note the names of the variables are arbitrary.
The next file contains the bulk of the code. If you want to examine any of these files, skip to the bottom of this post and you will find a link to an archive you can download. I called the next file generated.less. I included some initial documentation and them imported the definitions (line 15 below).
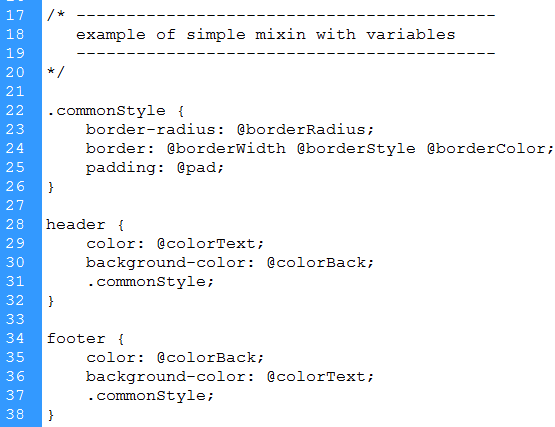
A core concept with LESS is something called a mixin. An example is shown below. Think of this as a group of properties which can be used repeatedly. One can also include variables within the mixin. The naming is similar to a class.
.commonStyle is the mixin. Note that is is mixed in both the header and footer element styles. I simply changed the foreground and background colors in the header and footer. The remaining properties are the same (hence the use of the commonStyle mixin). Hopefully, you are starting to see the value in LESS. We can easily change the value of a variable and it will instantly ripple throughout the generated CSS. We could also add properties to a mixin and it would replicate as appropriate. Next time you examine a CSS file you have created, think of how much easier it might have been to group common items and have variables when you were writing it.
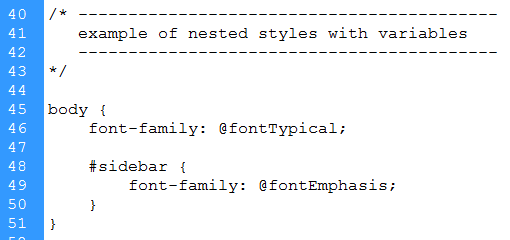
We can also nest styles. In the code snippet below you see that being done.
In the above example, we establish a font for the body element and nest a different font for the sidebar identifier (within the body element). I know this is a very simple example. Hopefully you are already thinking how this could be applied in a broader sense.
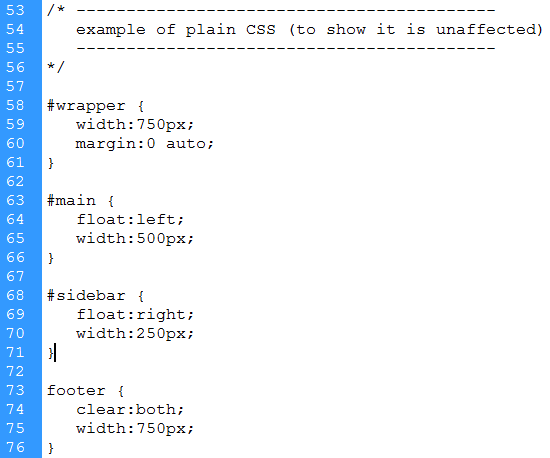
We can also include plain CSS as needed. This will simply be passed through the generation process unaffected. For our purposes, I created 2 columns and just coded the CSS without use of any variables.
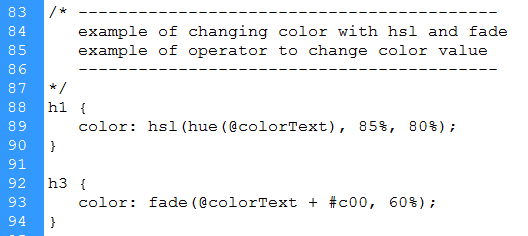
Next, we unlock the power of LESS using functions. In the example below, I am applying hue, saturation, and lightness values based on the color provided. I am then using the fade function to lighten the color to 60% of its original value.
All the above will become proper CSS when run through CodeKit. If you have sharp eyes, you may also notice I did some simple math with the color variable. @colorText originally contained #009. I added #c00 to it generating the new color #c09. I find this most impressive. As long as you dream in rgb or hex, you can easily change colors on the fly (as they relate to other colors).
Lastly, I dynamically change the width of a border in the snippet below.
@borderwith was originally set to 1 pixel. On line 104 above, I add 5 more pixels (for a width of 6 pixels). I also use the lighten function to affect the color. You can examine the source code (link below) and the actual example for more details.
Once I make any change to a file in the folder I have linked in CodeKit, the CSS is automatically generated. I receive the message below (if successful) or a log error message if I make a mistake (such as unbalanced braces or parentheses).
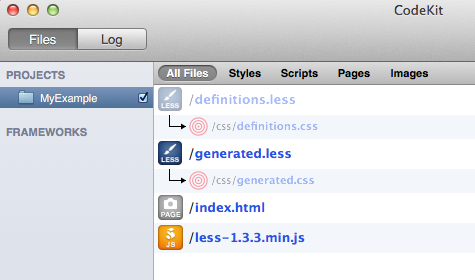
If one examines CodeKit, one see all the files and the results (below).
I encourage you to examine the CSS in my working example. Obviously you will need to view the source code (and focus on the CSS). Note all the CSS is generated form these 2 .less files using CodeKit.
If you wish, you can download the example files I mentioned in this post. You can also see the working example (I chose not to minify any CSS to make it easier to view the results).
This weblog post was inspired by the CSS with LESS and SASS course at lynda.com by Joe Marini. If you wish to learn more about LESS, I recommend that course. If you do not have ready access to lynda.com tutorials, you could also review the website Learning LESS.
As always, I am interested in feedback. Did you find this overview useful? Are you inspired to further investigate LESS? I look forward to your comments.





Very easy to understand Code…very nice work