I do enjoy taking snapshots (not photographs). That being said, I have been interested in time lapse photography. I always wondered how it was done. After a little research (along with a couple of lynda.com tutorials), I developed an understanding of how this is accomplished.
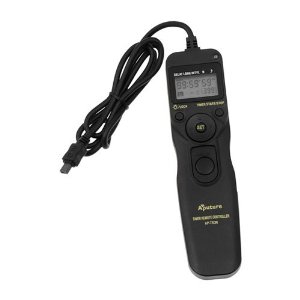
The key to creating time lapse photos is to have a device called an intervalometer. Yes, that is the name. Essentially, these devices attach to your camera and allow you to take photographs at a specified interval (hance the term). I placed a copy of the one I purchased below. They are relatively inexpensive, but you need to make certain you select the right one for your camera. Keep in mind that more expensive cameras may already have this capability built in.
Once you have obtained the device, you need to set the desired start time (I used a delay of 5 seconds until the first photo). You also need to specify the duration of each photo, the time interval between photos, and the total number of photos you want to capture. You then power your camera off and connect the intervalometer to the camera. Hint: I mounted the camera on a tripod. Also, do not move your camera (even a bit) onc you have begun capturing images.
On the camera itself, I set the ISO to 800 for a greater depth of field. I also adjusted the shutter speed and set the capture mode to manual and single image. Keep in mind you want to have a reasonable depth of field because subject may move a bit over time. One might want to capture the photos in the camera’s raw format. I chose jpeg as I am still learning how to use the device (and this is just a trial). If you do chose the raw format (.NEF in my case), you would need to use a tool like Lightroom or Camera Raw to convert all the photos to jpegs prior to creating the time lapse sequence.
I then collected the images with my D3100 camera. Make certain to have the file names set to an auto numbered sequence.
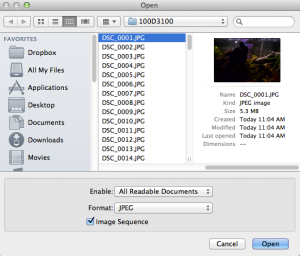
After obtaining the images, I opened Photoshop and selected File > Open from the menu. Select the first image from the camera SD card and make certain the image sequence box is checked. Note the screen capture below (click on the image to see it in actual size).
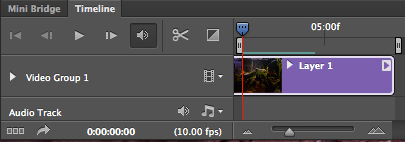
As the images are brought in, they will be automatically placed into a video by Photoshop. Note the video timeline screen capture below.
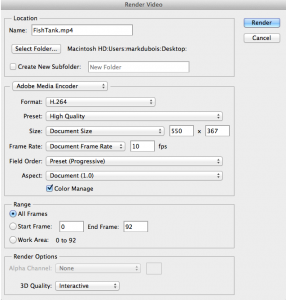
One may want to adjust the brightness and contrast (or other capabilities) of the video. I didn’t do a lot. Once you are satisfied with the result, you can use the File > Export > Render Video option to generate the appropriate video file. As you note in the screen capture below, I took most of the default values (after all, this is my first attempt). Click on the image to see the full sized view.
That is all one needs to do. For those who are interested, I provide a link to the PSD file (you will need a current version of Photoshop to open it). I also provide the actual video I generated below (it is in MP4 format). I also provide a link below in case you want to download a copy. Since this is a video, I link to my Screencast account since that is a streaming media server.
Now you know the basics of creating time lapse photo sequences. I plan to experiment more as time permits. Let me know if you found this overview helpful (comments below – I have to review and approve them due to the large volume of spam comments).


